

Run Proof of SQL queries with CRE HTTP workflows
Space and Time is available now on the Chainlink Runtime Environment (CRE). This opens access to verifiable, ZK-proven SQL queries from any smart contract that is compatible with CRE.
Instead of trusting a centralized data feed, your contract logic can consume query results that come with a cryptographic proof that the result is correct and the underlying data has not been tampered with.
What you will build
You will build a CRE HTTP workflow that:
- Receives a Proof of SQL result as its HTTP payload.
- Verifies the proof inside the workflow using the Space and Time SDK.
- Reads the typed result columns so they can drive whatever comes next, such as an onchain write, a gating decision, an oracle update, or a verified response.
The query and result columns in this guide are illustrative. The same pattern works for any SQL query over data indexed on the Space and Time network.
How the runtime flow works
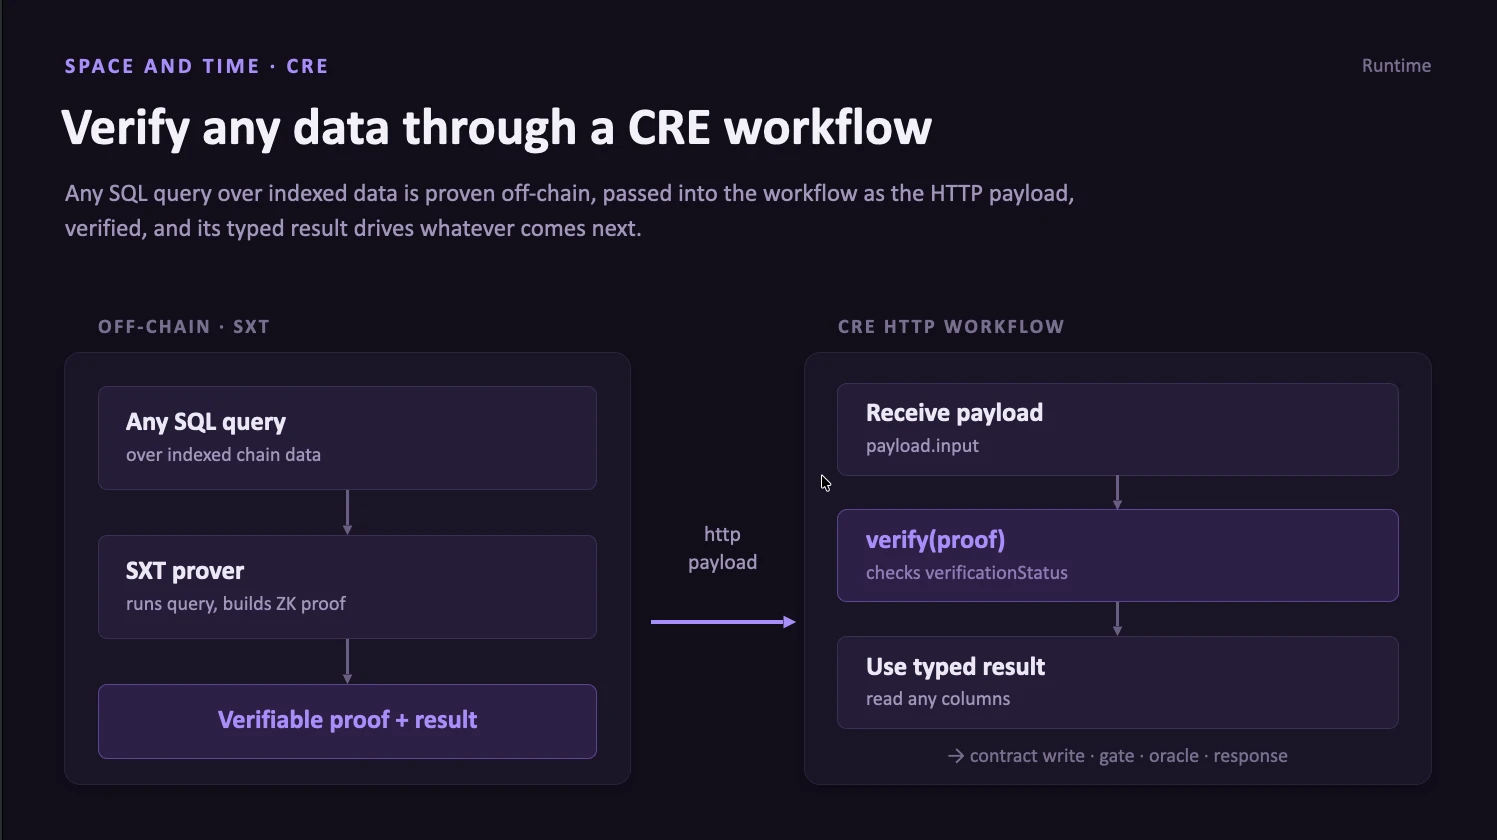
At a high level, the proof is generated off-chain and verified inside the workflow. The proof is the trust layer. The typed result is the usable data.
- Off-chain (Space and Time). Any SQL query runs against indexed chain data. The SXT prover executes the query and builds a verifiable ZK proof alongside the result.
- Into the workflow. The proof and result are passed into the CRE workflow as the HTTP payload.
- Inside the workflow. The workflow verifies the proof, checks the verification status, and on success reads the typed result columns for downstream use.
Prerequisites
CRE basics
Refer to the CRE docs as needed.
- Install bun:bashsudo apt install unzip && curl -fsSL https://bun.com/install | bash
- Install the CRE CLI (version 1.10.0 is used in this guide):bashcurl -sSL https://app.chain.link/cre/install.sh | bash
- Create a CRE account as described here, then log in with
cre login. - Acquire a funded Sepolia account.
Space and Time basics
- Create a Space and Time Pay Per Compute (PPC) account. You can sign up and run queries from the Studio.
- Acquire an SXT API key. This is a two-step process: first log in, then create an API key. The API key is used to query the SXT prover.
Step 1: Create an empty HTTP workflow
Create the default CRE hello world TypeScript project:
cre init --non-interactive -p posql-demo -w http -t hello-world-ts && cd posql-demoInstall dependencies:
bun install --cwd ./httpReplace everything in main.ts with the following:
import { cre, HTTPPayload, Runner, type Runtime } from "@chainlink/cre-sdk";
type Config = {}
const onHttpTrigger = (runtime: Runtime<Config>, payload: HTTPPayload): string => {  return "Success";};
const initWorkflow = () => {  const httpTrigger = new cre.capabilities.HTTPCapability()
  return [cre.handler(httpTrigger.trigger({}), onHttpTrigger)]}
export async function main() {  const runner = await Runner.newRunner<Config>();  await runner.run(initWorkflow);}
main()
At this point you should be able to run the simulation successfully:
cre workflow simulate ./http --non-interactive --trigger-index 0 -T staging-settings --http-payload "{}"Reference the CRE docs as needed.
Step 2: Add Proof of SQL as a dependency
To use Proof of SQL from inside the workflow, add the Proof of SQL dependency and switch the workflow to CRE custom builds.
First, modify package.json to add sxt-proof-of-sql-cre-sdk-typescript:
"dependencies": { "@chainlink/cre-sdk": "1.5.0-alpha.3", "sxt-proof-of-sql-cre-sdk-typescript": "0.0.1"}Install the dependencies:
bun install --cwd ./httpConvert the workflow to use custom builds. Refer to the CRE docs as needed:
cre workflow custom-build ./http -fReplace everything in Makefile with:
.PHONY: build
build:	mkdir -p wasm	bun cre-compile --plugin node_modules/sxt-proof-of-sql-cre-sdk-typescript/dist/sxt_proof_of_sql.plugin.wasm \		main.ts \		wasm/workflow.wasm
clean:	rm -rf wasm
Then run the build:
cd ./http && make build && cd ../Step 3: Verify a Proof of SQL result in the workflow
Now modify main.ts to verify and read the proof.
import { proofOfSql } from "sxt-proof-of-sql-cre-sdk-typescript";
const input = payload.input.toString();const queryResult = proofOfSql().verify(input, []);
switch (queryResult.verificationStatus) {  case "Success":    const blockCountColumn = queryResult.result.BLOCK_NUMBER;    switch (blockCountColumn.type) {      case "BigInt":        runtime.log(`First retrieved: ${blockCountColumn.column[0]}`);        return "Success";      default:        return "Failure";    }  case "Failure":    return "Failure";}
The verificationStatus field tells you whether the proof checks out. On Success, the result exposes each column with its type known at compile time, so you handle a BigInt column as a BigInt before reading its values. This is what makes the result safe to use in downstream logic.
Step 4: Simulate the workflow
Generate a proof with the Space and Time SDK and feed it into the workflow as the HTTP payload:
export SXT_API_KEY={YOUR_SXT_API_KEY} &&export QUERY="select BLOCK_NUMBER from ETHEREUM.BLOCKS LIMIT 1" &&output=$(npx @spaceandtime/ts-proof-of-sql-sdk) &&cre workflow simulate http --non-interactive --trigger-index 0 -T staging-settings --http-payload $outputIf everything is wired up correctly, the workflow verifies the proof and logs the first retrieved block number.
Where to go from here
Because the result is verified and typed, you can use it as trusted input to any CRE-compatible smart contract. Common next steps include writing a verified value to a contract, gating logic on a proven threshold such as a reserve balance, updating an oracle, or returning a verified response to the caller.
To adapt this to your own use case, change the SQL query and read the result columns you care about. The verification and payload flow stay the same regardless of what data you query.